Wednesday, December 14, 2011

I'm BAAACK

Holy Cow..  It's been awhile!

So after life craziness and a trip to mexico.. I am finally home and getting into the Christmas Spirit.  Today we are having an office ornament exchange.  For my delicious plate of food I brought in some Crescent Roll Cream Cheese Bars.  They are delicious and made even better by the addition of vanilla, bananas and honey...  Some of my favorite flavors of all time...
Here is the original recipe from Pillsbury   MY changes are in green.

INGREDIENTS

2 - Pillsbury® Refrigerated Reduced Fat Crescent Dinner Rolls 8 oz (8 ct)
1 Package reduced fat cream cheese, softened (8oz.)  I prefer all of my fat...
1/2 teaspoon vanilla
1 cup sugar, plus 1 teaspon
2 bananas sliced
1/4-1/2 cup drizzle of honey
2 teaspoon cinnamon
2 tablespoons melted butter

DIRECTIONS
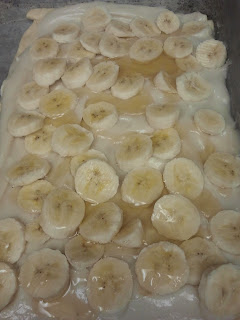
1 Preheat oven to 350. 2 Unroll 1 can of the crescent rolls and place into a 9x13 pan, smoothing out the seams. 3 Mix together the cream cheese and sugar and vanilla  with electric mixer until blended well. 4 Spread cream cheese mixture on top of crescent rolls.  Evenly spread over banana slices and drizzle honey over all. 5 Unroll 2nd can of crescent rolls and place on top of cream cheese mixture, pinch together the seems. 6 Brush top with melted butter. 7 Sprinkle with 1 teaspoon sugar and 2 teaspoons cinammon. 8 Bake at 350 for 20 minutes or until lightly brown. 9 Cut into bars and serve.
 final goooooey goodness...

Just had to show you my Mexican honey..  You know it's good when they caught a bee inside... Yum..


Thursday, November 3, 2011

Thanksgiving Printables

Check out this Wordle Subway Art I made.  Click on the image and print out your own!

Wordle: Untitled

And here is a super cute Thanksgiving Quote from Erma Bombeck.

Monday, October 31, 2011

Cheap/Easy Halloween and Thanksgiving Centerpiece

Sorry the pictures are lame but here is a $3 centerpiece for Halloween or Thanksgiving that literally takes 3 minutes!

Go to Dollar store and buy straw colored crinkled packing ( in gift bag section), a bag of candy corn and a vase.

Pour 3/4 of the bag into the vase.  Pour candy corn over the top.  Take an appropriately colored ribbon.  Cut to size of the diameter of vase with an extra 1/4in overage.  Put one dot from a glue gun and Whoo hoo you're done...  Literally think it took me longer to type this that actually do it!

We used this for a few tables at our church chili cook off.  I think they look adorable!    BTW there was more candy corn but there were quite a few hands that got into this one!
Thursday, October 20, 2011

Improv cooking challenge: caramel apple nachos

I am super excited to be a part of The Lady Behind the Curtain's Improv Cooking Challenge!
 This month she gave us two ingredients to create an original recipe with.  This reminds me of Chopped which is one of my favorite shows! After discussing with super smart (and very handsome) hubby   he suggested Caramel Apple Nachos..... How can you go wrong with that?


I started by cutting 2 flour tortillas into 8 triangles each.  I chose to fry them to create a chip but feel free to bake them also.   After removing from oil I immediately tossed into cinnamon sugar to coat.

Next I chopped one granny smith apple into small cubes.  I sauteed the apples in 1TB of butter and generous sprinkling of the remaining cinnamon sugar.   Cook until tender.  After turning off the heat pour in several spoonfuls of caramel ice cream topping and allow to melt into the apple mixture.

Pour apple mixture over chips.  Drizzle over vanilla bean cream cheese dip from Walmart.  
 
Sprinkle on either chopped red apple or red hots to look like tomato salsa  and top off with whipped cream or ice cream to be your sour cream.


BTW..  This got an enthusiastic thumbs up from hubby : ) 

And As Always my faithful kitchen helper was begging for scraps...


The Improve Cooking Challenge

Friday, October 7, 2011

MOM's Crazy Cooking Challenge Brown Butter Chocolate Chip Cookies

I"M #60  VOTE FOR ME!!

It's that time again for Mom's Crazy Cookie challenge.
Photobucket

For this month I visited the blog of a cute 21 year old guy named Ryan who loves baking and pugs.  Check out the original recipe here    http://ryansbakingblog.com/2011/01/brown-butter-chocolate-chip-cookies/


I decided to make Brown Butter Chocolate Cookies to try something a little different.   I changed Ryan's recipe a little.  These have a tendency to dry out/ over cook quickly so watch them.  But over all they have a delicious toffee essence and are worth the extra work they take.


Brown Butter Chocolate Chip Cookies

Makes about 3 dozen cookies  ( or if you're me....   20 cookies : )  I like mine bigger)
1 3/4 cups unbleached all-purpose flour
1/2 teaspoon baking soda
1 3/4 sticks unsalted butter, divided
1/2 cup granulated sugar
3/4 cup packed dark brown sugar
1 teaspoon table salt
2 teaspoons vanilla extract
1 large egg, plus 1 egg yolk
1/2 bag dark chocolate chip cookies
Preheat oven to 350°F. Line baking sheets with a silpat or parchment paper.
Sift together flour and baking soda in a bowl, set aside.
In a skillet, melt 1 1/4 sticks butter over medium high heat. Continue to cook until the butter turns dark golden brown and has a nutty aroma. The butter will bubble and boil before starting to change colors, keep a close eye so it doesn’t burn and swirl pan occasionally to ensure even cooking.

Transfer browned butter to a bowl and mix in the remaining butter until melted. Add the sugars, salt, and vanilla to the butter and mix well. Add the egg and egg yolk; whisking until smooth (about 30 seconds). Allow the mixture to rest for 3 minutes, then whisk against for 30 seconds, before letting it rest again. Repeat this process about 4 times, until you have a thick, glossy, smooth mixture.


 SEE THE DIFFERENCE THE WHIPPING MAKES?????!!!!


Sprinkle the flour and baking soda over the top a little at a time, gently stirring until it is just combined. Stir in the chocolate chips.
 I don't roll dough into balls or use a silpat...  Sorry... not that kinda baker...
Form dough balls about 3 tablespoons in size, place them on the prepared baking sheet about 2 inches apart. Bake for 10-14 minutes, then put the baking sheet on a cooling rack and allow to cool on the sheet.

Cookies are best served warm right after baking, or stored in airtight containers and microwaved for 20-30 seconds prior to serving.


Thanks Ryan for your awesome recipe!!

Wednesday, September 28, 2011

Guest Blog on One Little Mister

I created a cute little baby printable and picture frame.
Nicole had a baby and used my tutorial as a guest post.  Check it out at:

Here is a picture of the printable.


GO  Visit! One Little Mister Parenting Blog

Sometimes Pregnant Ladies need Cheesecake at night.

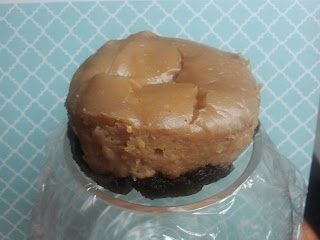
So last night I was craving a sweet treat but just boxed brownies wasn't going to cut it.  I decided to make individual Peanut Butter Brownie Cheesecakes.  This is the recipe for what I concocted but you can adjust to your taste.

This recipe makes enough for 4 ramekins and a little extra of the brownie cookie.

I started by taking a box of brownie mix (one that makes an 8x8 or 9x9 pan)  I followed the directions EXCEPT i did not add water.  This makes more of a cookie version that a thick brownie.

Add brownie mixture to the bottom of the ramekin (probably 1/4cup)  no need to grease ramekins these are oily enough.

Combine   8oz softened cream cheese
1/2 cup peanut butter
2 Tbs of Honey
1/8 cup powdered sugar
1 egg
1 tsp vanilla
Mix thoroughly and pour over unbaked brownie crust.


I baked these for 28 min @ 325*
You can probably try a water bath to make sure they don't crack.

Place in Fridge until completely chilled and set up.  
To Remove run knife around side of ramekin and the cheesecake should slide out.


Only thing missing from the picture is some caramel sauce.......  Mmmm   Caramel..

Monday, September 19, 2011

Halloween Printables

Halloween is Coming!!  I love to decorate but it can get costly.  Here are a few printables that you can throw in a cheap frame for easy and low cost decorations!
Sep 19, 2011
From Sep 19, 2011

Thursday, September 15, 2011

Paper Crafties #2

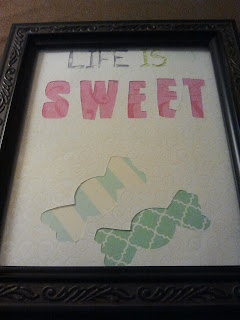
So I've seen around pinterest and the rest of the internet really cool little stencil or cut out art pieces and thought I would try it out. 

So this is the idea I came up with.  This was pre cricut  so  I think I will try again with a steadier cut but I thought the idea was cute nonetheless.

I started with creating 2 sign ideas on picnik.


You can use these as printables or as templates for the project.

I then used an xacto knife to cut out the shapes.

After that I cut small squares and reqtangles out of scrapbooking paper to be the fill in colors.  I taped them onto  the back and thats it.  Stick it in a frame and you are all set!

Wednesday, September 7, 2011

Mom's Crazy Cooking Challenge

I was super excited to get an invite from Mom's Crazy Cooking for her monthly Cooking Challenge.  This month's theme was Mac and Cheese...  Oh how I love cheese...   The task was to visit someone else's blog and find a recipe that we could make and share.  

I stopped by Recipes from Newlyweds http://recipesfromnewlyweds.blogspot.com/.   A cute Blog from a Girl named Anna.  Go Visit her!  She made a gnocchi mac and cheese that sounded delicious!!

Here is the recipe.  If you have not tried gnocchi you are missing out!!
Gnocchi Mac and Cheese

Ingredients:
1 pound purchased or homemade gnocchi
2 Tablespoons butter
2 teaspoons garlic, finely chopped
1 Tablespoon all-purpose flour
3/4 cup milk
1 teaspoon Dijon mustard
1/4 cup shredded Gruyere cheese
1/4 cup shredded fontina cheese
1 tsp basil
Salt and white pepper to taste
1/3 cup shredded Parmigiano-Reggiano

Directions:
Preheat oven to 375 F. Prepare gnocchi according to package directions. Drain and place gnocchi in a single-layer in a 1-1/2 quart shallow baking dish that has been sprayed with nonstick spray.

Melt butter in a medium saucepan over medium heat. Stir in garlic and cook until fragrant, about 30 seconds. Whisk in flour until it thickens and bubbles, then whisk in milk and Dijon. Continue to whisk mixture and cook until slightly thickened, about 3-5 minutes.

Combine Gruyere and fontina, then add by the handful to milk mixture, stirring until melted before adding the next handful. Once all cheese is melted, add basil, salt and pepper.

Pour sauce over gnocchi and sprinkle with Parmigiano-Reggiano over top. Bake gnocchi until they puff and cheese is golden and bubbly, about 25 minutes. Let gnocchi rest for 5 minutes before serving.


 I didn't have a ton of time so I couldn't make my own gnocchi.  I found this in the dry pasta section of the store. Once again gnocchi (NN YOKE EE)is the best pasta ever (find your nearest italian restaurant for fresh stuff if you don't have time to make it)  It is a potato pasta dumpling.

MMMMMM....  Cheesey saucy mixture!


Baked Goodness!
Super YUM!!  The hubs loved it! TRY it!  and vote for me at Mom's crazy cooking!!!
Photobucket

Thursday, September 1, 2011

Crock Pot Yumminess

Tina over at Mom's Crazy Cooking is asking for favorite Crock Pot Recipes.  I thought I'd share one that my mom has made forever and I LOVE to make and eat as well.

                                                      Crock Pot Chicken Parisienne
6 medium boneless skinless chicken breasts

1/2 cup cooking sherry (You can substitute water or dry white wine but I love the tang!)

1 can cream of mushroom soup

1 4 oz  mushrooms sliced

1 cup sour cream

1/4 cup flour

salt, pepper and paprika - to taste


Sprinkle chicken with salt, pepper and paprika. Place in crock pot.
Mix wine, soup and mushrooms until well combined. Pour over chicken. Sprinkle with more paprika.
Cover and cook on LOW 7-9 hours or HIGH for 3-4 hours.
Remove chicken after done cooking.
Mix sour cream and flour together. Stir into crock and cook for 30 minutes.

Serve over rice or egg noodles.


Paper Crafties

I finally had the energy to work on my brother's girlfriends birthday present last night and one other project.. (A Week Late..)This was quite the accomplishment considering my favorite activity the last few weeks was staring at a tv and only moving if I absolutely had to. Thankfully I'm feeling a ton better and actually got something done!

I saw this adorable idea on pinterest.

I thought It was adorable! So I decided to make my own version.

I started with a small shadow box from Michaels.  I will say if you want a Big heart make sure your shadow box is deeper than the one I purchased.

This one allows for you to just pin your items into place.  I cut a piece of scrapbooking paper to the size I wanted and wrote in the line "Every heart has a story"  I changed it from the original..  I would love to claim it was because it was clever....  but it's just pregnancy brain...


I then took a newspaper ( you can use a book but i didn't have any I was willing to chop up)  and folded it in half.   I then cut out a half heart shape and then stacked and taped all of the pieces together.

I taped the heart in place and that finishes it.   Make sure your pieces splay open so that you can see each one individually.


 Hope she likes it!